Prerequisites:
Port 80 and 443 open – but if you’re already self-hosting a website, you should already have these ports open for Let’s Encrypt to work. In this guide, you don’t need to open these ports on your NAS.
Ubuntu with certbot and Let’s Encrypt and wildcard SSL configuration.
I assume you already know how to log in to Synology NAS and Ubuntu using SSH.
One off SSL setup.
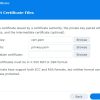
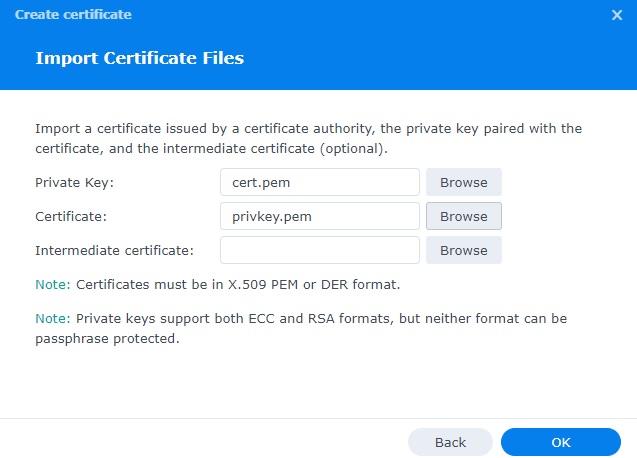
First, in Ubuntu, copy the certificate files from /etc/letsencrypt/live/grischke.pro and the files you will need are cert.pem (domain certificate), chain.pem (intermediate certificate (optional)) and privkey.pem (private key) to your computer. The .pem extension shouldn’t matter. At the end of the day it’s just a text file. Now, add this certificate manually to DSM manually:
Control Panel → Security → Certificate → Add → Choose Add a certificate → Next → Choose Import certificate → Next → On Private Key: click on Browse and choose the <myPrivateKey>.key file from your local computer. On Certificate: click on Browse and choose the <myCertficate>.cer file from your local computer. Leave Intermedia Certificate: empty. → OK
Your certificate should now look similar to this:

Now click on Settings → Configure → Select the certificate you just uploaded for every application you need, for example System default → press OK.
and select the according imported certificate for every single application as required from the according dropdown menu.
Then click on OK.
Now SSH to your Synology NAS. (I highly recommend MobaXterm app).
First, change and enable root login and password
sudo synouser -setpw root 'strong_password'
Check current ssh config and optionally allow Root Password Login using the following script. Alternatively, you can manually edit the config file and change “no” to “yes”.
sudo vi /etc/ssh/sshd_config
What the script below does is it checks and adjusts the option accordingly:
If the line #PermitRootLogin no exists, it will uncomment and change it to PermitRootLogin yes.
If the line PermitRootLogin no exists, it will change it to PermitRootLogin yes.
If the line #PermitRootLogin yes exists, it will uncomment it.
sudo sed -i 's/^#PermitRootLogin no/PermitRootLogin yes/; s/^PermitRootLogin no/PermitRootLogin yes/; s/^#PermitRootLogin prohibit-password/PermitRootLogin yes/; s/^PermitRootLogin prohibit-password/PermitRootLogin yes/' /etc/ssh/sshd_config
Restart ssh service
sudo systemctl restart sshd
Now, go to where certificates are kept on Synology NAS.
cd /usr/syno/etc/certificate/_archive/
ls -l
Each certificate installed on a Synology NAS is stored in a unique directory named with a string of six random characters, such as ZWP80f. If there are multiple certificates installed, you will see several directories. To identify the directory containing the recently imported certificate, verify the creation date that corresponds with the time the certificate was imported.

Identify which certificate is active and if you don’t have any active add it.
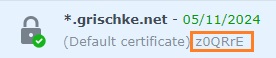
An important step is to add the cryptic directory name to your certificate manager’s description within the Synology DSM GUI. This action simplifies future management and ensures you can easily identify which cryptic certificate directory name corresponds to each of your domain certificates, a particularly useful practice when managing multiple certificates on your Synology DSM system.Control Panel → Security → Certificate → Right click the according certificate → Edit → Within the Description: input mask enter the according cryptic folder name → OK
Now your certificate description entry should be made and should look similar to this:
cd into that specific directory and run ls -l, you will see the same .pem files. If you were to upload certificates from other SSL provider, they would be renamed to cert.pem etc. and since we’re importing them from Ubuntu, they simply get uploaded to your NAS.
You already possess a functioning wildcard certificate on your Synology NAS; however, unlike the automated certificate renewal process on your Ubuntu, your Synology NAS lacks such a feature. Let’s address this issue.
Go back to DSM:
and change the SSL description to the name of the folder. Make sure the description is exactly the same as the directory name with six random characters.The directory will contain the following four files:
cert.pem
fullchain.pem
chain.pem
privkey.pem
To achieve an automated certificate renewal process on your Synology NAS, you must establish the corresponding environment via the command line interface.
Regrettably, merely replacing the updated certificate files on your Synology NAS following a certificate renewal process executed on your Ubuntu system is insufficient. Thus, simply copying over the new certificate files would not work. If you investigate further for a reason, you will find the following INFO file, the content of which contains the answer you seek:
cat /usr/syno/etc/certificate/_archive/INFO
It is evident that Synology DSM utilises this file to keep track of the certificate assigned to each application. While it’s possible to manually edit each entry, a script can automate this process (more on that shortly). The script operates by searching for and replacing the relevant certificate, utilising the desc description tag within the INFO file—this corresponds to the description previously established for the certificate in question.
Now, let’s proceed and follow the subsequent steps.
Create a script file called update-cert.sh… using the vi text editor (to save and exit, press Escape key and then type :wq and press enter)
vi /usr/syno/etc/certificate/_archive/update-cert.sh
Paste the following script:
!/bin/bash

UPDCERT_USAGE="Usage: ./update-cert CERT_NAME [--by-id]"

CERTS_ROOTDIR=/usr/syno/etc/certificate/_archive/certs
CERT_NAME=$1
CERT_FILES=(cert.pem fullchain.pem privkey.pem)

if [ -z $CERT_NAME ]; then
echo $UPDCERT_USAGE
exit -1
fi
if [[ ( -n $2 ) && ( $2 != --by-id ) ]]; then
echo $UPDCERT_USAGE
exit -1
fi

CERT_DIR=${CERTS_ROOTDIR}/$CERT_NAME

for CERT_TARGET_DIR in $(python get-cert-dirs.py $CERT_NAME $2); do
for CERT_FILE in ${CERT_FILES[@]}; do
eval "cp ${CERT_DIR}/$CERT_FILE ${CERT_TARGET_DIR}/$CERT_FILE"
eval "chown root:root ${CERT_TARGET_DIR}/$CERT_FILE"
eval "chmod 600 ${CERT_TARGET_DIR}/$CERT_FILE"
done
echo
done
Create a second python script
vi /usr/syno/etc/certificate/_archive/get-cert-dirs.py
Paste the following script
#!/usr/bin/env python

usage = "./get-cert-dirs.py CERT_NAME [--by-id]"

system_dir = "/usr/syno/etc/certificate"
pkg_dir = "/usr/local/etc/certificate"
archive_dir = system_dir+"/_archive"
info_path = archive_dir+"/INFO"

import sys
import json

def parse_info(cert_name, by_description=False):
    certs = json.loads(open(info_path).read())
    if by_description is True:
        cert_id = None
        for key in certs.keys():
            if certs[key]['desc'] == cert_name:
                cert_id = key
                break
        if cert_id is None:
            return None
    else:
        cert_id = cert_name
    try:
        cert_info = certs[cert_id]
    except KeyError:
        return None

    paths = ["\"{}/{}\"".format(archive_dir, cert_id)]
    for service in cert_info['services']:
        root_dir = pkg_dir if service['isPkg'] is True else system_dir
        path = "\"{}/{}/{}\"".format(root_dir, service['subscriber'], service['service'])
        paths.append(path)

    return paths

if __name__ == "__main__":
    wrong_usage = False
    args_num = len(sys.argv) - 1
    if args_num < 1:
        wrong_usage = True
    elif args_num == 2 and sys.argv[2] != "--by-id":
        wrong_usage = True
    elif args_num > 2:
        wrong_usage = True
    if wrong_usage is True:
        print("Usage: "+usage)
        sys.exit(-1)
    cert_name = sys.argv[1]
    by_description = True if args_num == 1 else False
    dirs = parse_info(cert_name, by_description)
    if dirs is not None:
        print(" ".join(dirs))
Now make both scripts executable:
chmod +x /usr/syno/etc/certificate/_archive/update-cert.sh
chmod +x /usr/syno/etc/certificate/_archive/get-cert-dirs.py
Now, create the corresponding directory required for the scripts. Note: It is crucial to replace <myCertificateDescription> with the description text you provided during the certificate import process. The description text must match the corresponding directory name and is case-sensitive.
mkdir -p /usr/syno/etc/certificate/_archive/certs/<myCertificateDescription>
Now, connect to your Linux (in my case, Ubuntu) using SSH.
Create the script in Ubuntu:
# create script directory
mkdir ~/scripts
# create script file
vi ~/scripts/renewNASSSH.sh
Copy the following and paste it in the “renewNASSSH.sh”, save and quit (Escape > :wq > Enter).
#!/bin/sh
#
# Copy certificate files to temporary directory on Synology NAS:
#NAS
scp -O /etc/letsencrypt/live/grischke.pro/fullchain.pem [email protected]:/usr/syno/etc/certificate/_archive/certs/ZWP80f/fullchain.pem
scp -O /etc/letsencrypt/live/grischke.pro/privkey.pem [email protected]:/usr/syno/etc/certificate/_archive/certs/ZWP80f/privkey.pem
scp -O /etc/letsencrypt/live/grischke.pro/chain.pem [email protected]:/usr/syno/etc/certificate/_archive/certs/ZWP80f/chain.pem
scp -O /etc/letsencrypt/live/grischke.pro/cert.pem [email protected]:/usr/syno/etc/certificate/_archive/certs/ZWP80f/cert.pem
#NASS
scp -O /etc/letsencrypt/live/grischke.pro/fullchain.pem [email protected]:/usr/syno/etc/certificate/_archive/certs/163sba/fullchain.pem
scp -O /etc/letsencrypt/live/grischke.pro/privkey.pem [email protected]:/usr/syno/etc/certificate/_archive/certs/163sba/privkey.pem
scp -O /etc/letsencrypt/live/grischke.pro/chain.pem [email protected]:/usr/syno/etc/certificate/_archive/certs/163sba/chain.pem
scp -O /etc/letsencrypt/live/grischke.pro/cert.pem [email protected]:/usr/syno/etc/certificate/_archive/certs/163sba/cert.pem
#NASSS
scp -O /etc/letsencrypt/live/grischke.pro/fullchain.pem [email protected]:/usr/syno/etc/certificate/_archive/certs/z0QRrE/fullchain.pem
scp -O /etc/letsencrypt/live/grischke.pro/privkey.pem [email protected]:/usr/syno/etc/certificate/_archive/certs/z0QRrE/privkey.pem
scp -O /etc/letsencrypt/live/grischke.pro/chain.pem [email protected]:/usr/syno/etc/certificate/_archive/certs/z0QRrE/chain.pem
scp -O /etc/letsencrypt/live/grischke.pro/cert.pem [email protected]:/usr/syno/etc/certificate/_archive/certs/z0QRrE/cert.pem
#
# Update certificate on Synology NAS remotely:
ssh [email protected] "sudo /usr/syno/etc/certificate/_archive/update-cert.sh 'ZWP80f'"
ssh [email protected] "sudo /usr/syno/etc/certificate/_archive/update-cert.sh '163sba'"
ssh [email protected] "sudo /usr/syno/etc/certificate/_archive/update-cert.sh 'z0QRrE'"
#
# Delete temporary certificate files:
ssh [email protected] "rm -rf /usr/syno/etc/certificate/_archive/certs/ZWP80f/*"
ssh [email protected] "rm -rf /usr/syno/etc/certificate/_archive/certs/163sba/*"
ssh [email protected] "rm -rf /usr/syno/etc/certificate/_archive/certs/z0QRrE/*"
#
# Reboot Synology NAS:
# ssh [email protected] "systemctl restart nginx"
# ssh [email protected] "systemctl restart nginx"
# ssh [email protected] "systemctl restart nginx"
#
# Optional
# ssh [email protected] "sudo reboot now"
# ssh [email protected] "sudo reboot now"
# ssh [email protected] "sudo reboot now"
With the above script, the last section is commented out. If you want to restart DSM, uncomment restart nginx section, if you have more services, it’s safer to reboot the NAS – for this, uncomment the last three lines instead.